Table of Contents
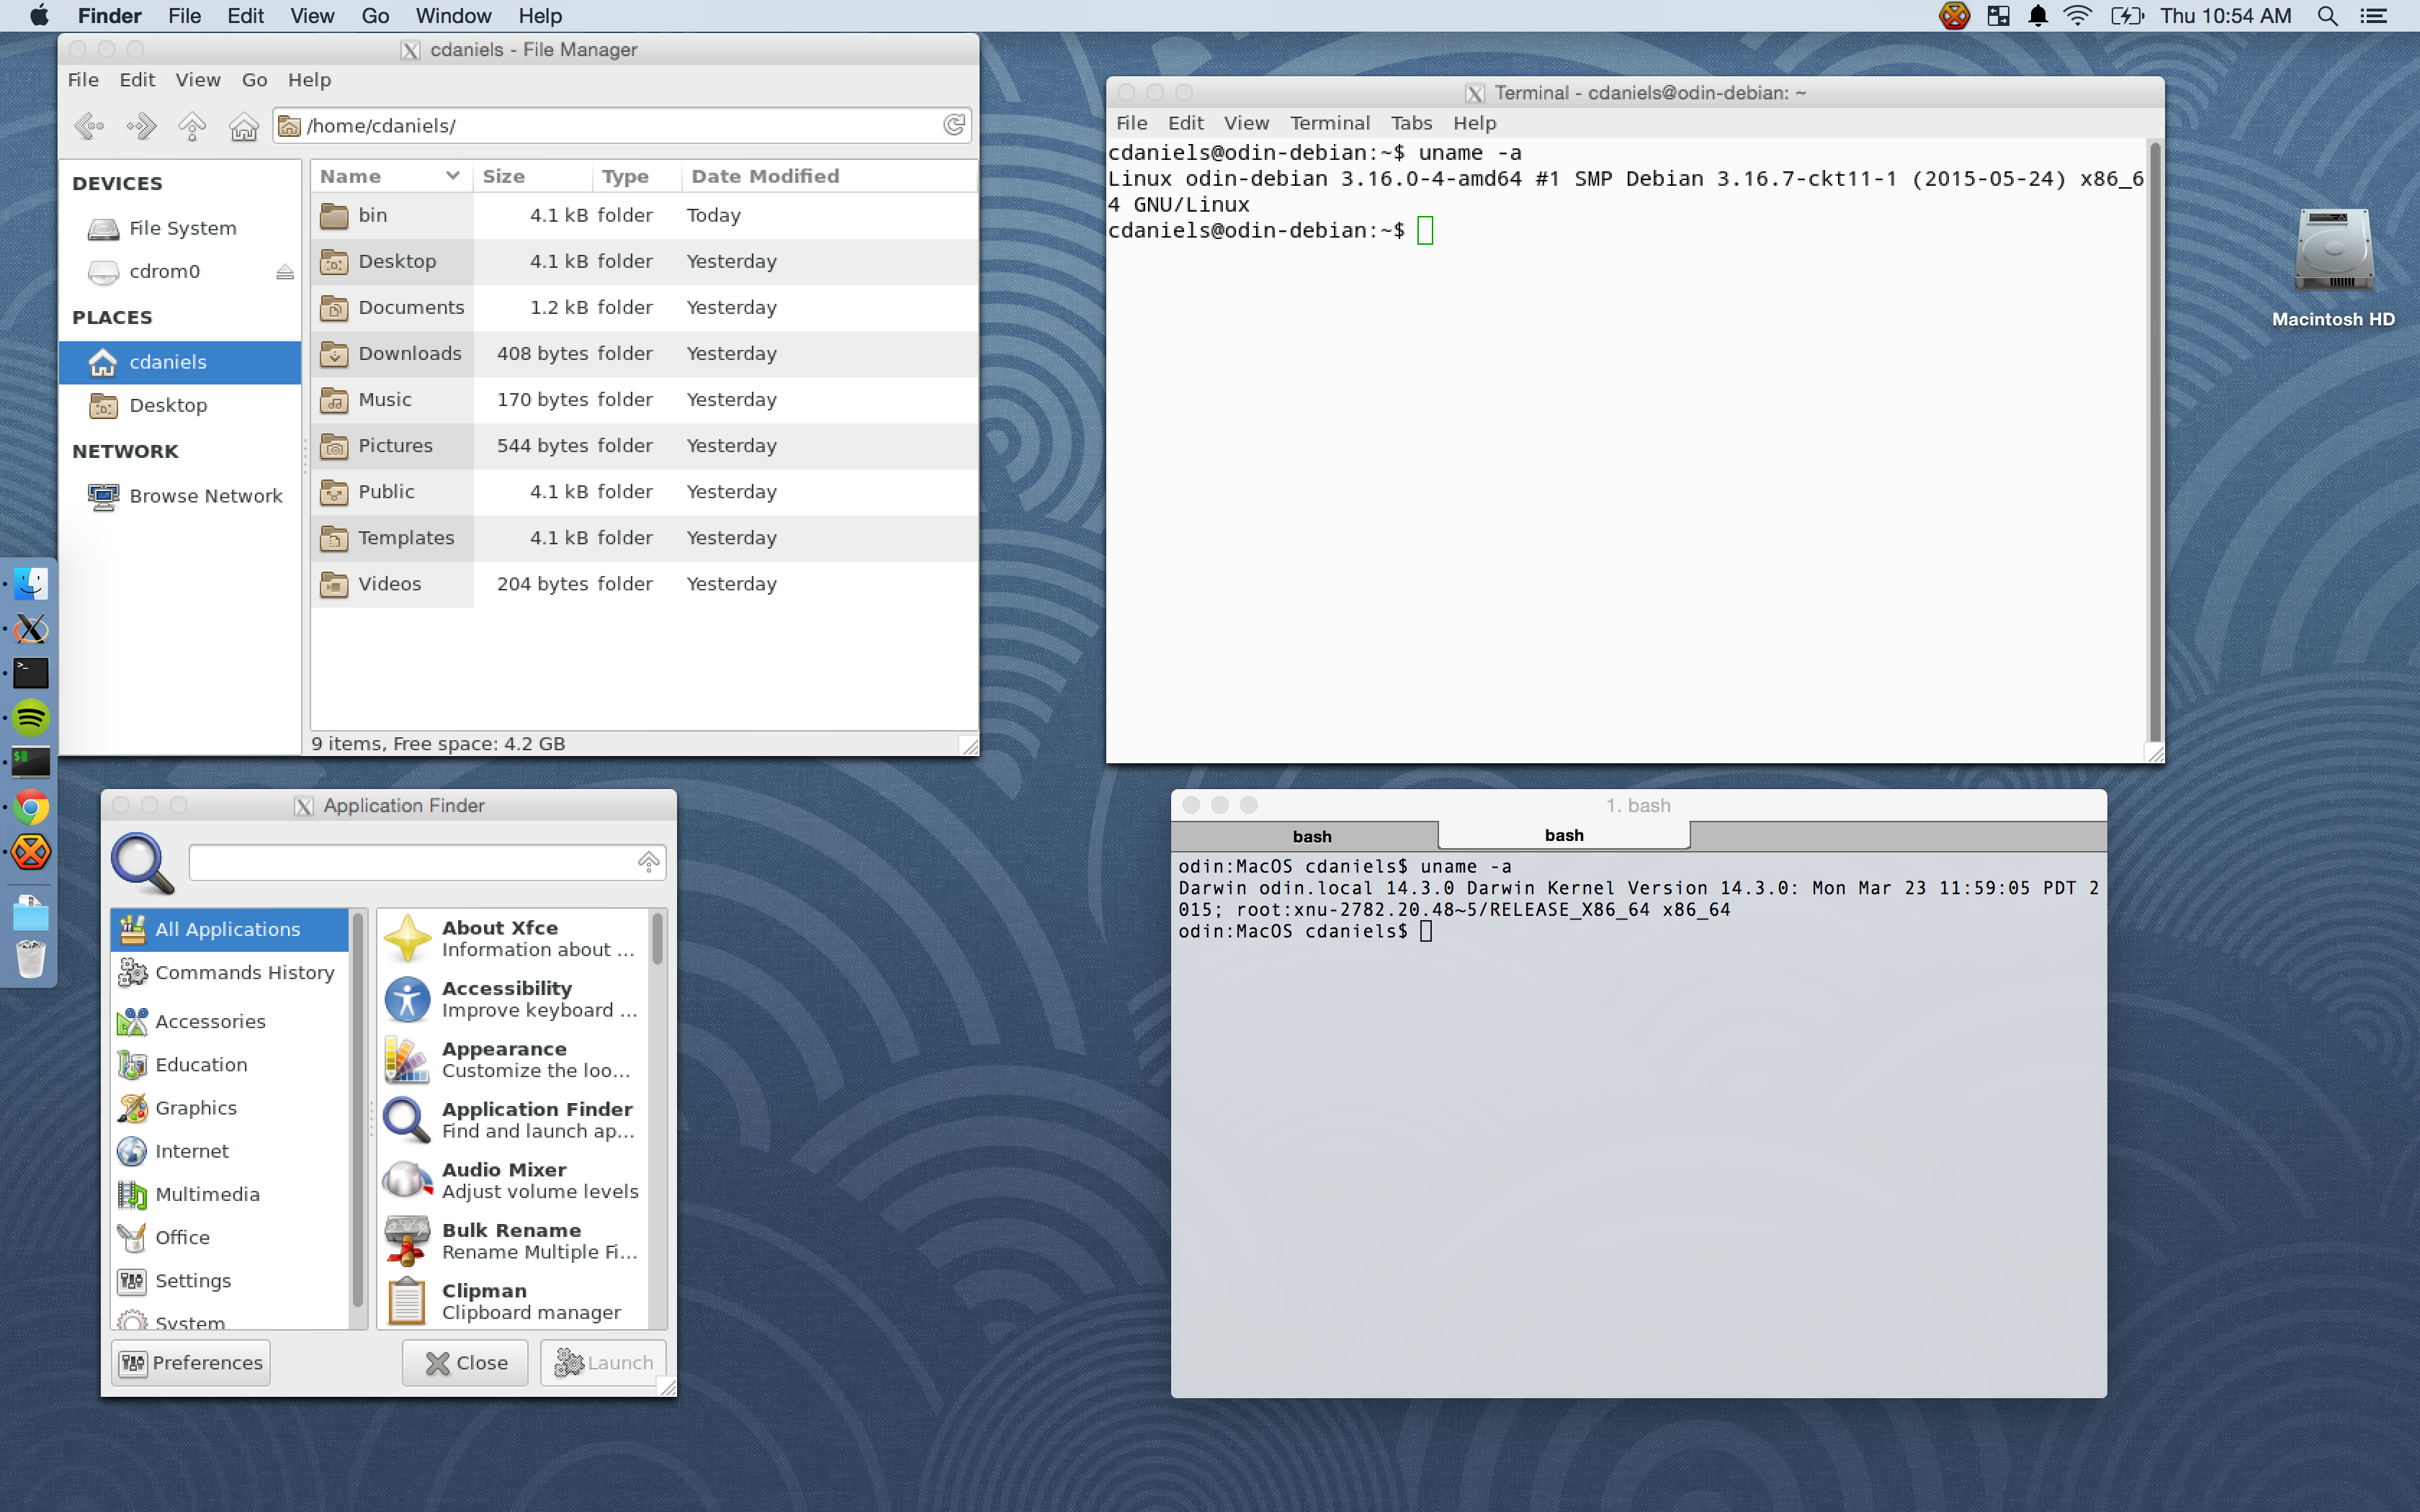 The end result.
#
Introduction
About a year back, someone on reddit posted a very clever trick, running linux applications natively in OSX using a headless Debian virtual machine, connected to X11.app over ssh. I decided to replicate this on my own system, and finding documentation and guide lacking, I have decided to create my own for others wishing to follow in my footsteps.
While getting this type of thing up and running is not as hard as it looks, you will still need some basic knowledge. For this guide, I will assume you are familiar with the following. In case you are not, each bullet point is a link with information on the topic.
##
But why?
-
It’s cool
-
You can impress your friends and co-workers
-
Run Linux-only packages on OSX (for me, this makes using keepassx much easier)
-
Access a true Linux shell on your local machine
-
Valuable learning experience
#
Overview
-
Install Debian in Virtualbox
-
Configure the Debian installation
-
Configure SSH
-
Mac OSX integration
-
Start on login
#
Prerequisites
-
VirtualBox installed on your mac
-
X11.app installed on your mac
#
Install Debian in Virtualbox
As previously stated, this guide assumes you are already familiar with VirtualBox and installing Debian, so I will not cover this process in great detail. However, I will make a few recommendations on how your Debian installation should be configured.
-
You should select xfce as your desktop environment (others will probably work, but this guide covers xfce)
-
Depending on your system, you should give Debian at least 10GB of disk space, at least two CPU cores, and at least 2GB of RAM. You can probably get by with less, but performance may be impacted; these numbers seem about right to me on a Macbook Pro 2015, and I notice no major slowdowns in OSX or Debian.
-
Be sure to install the VirtualBox guest additions, we will need them for folder sharing later on.
#
Configure the Debian Installation
First, we need to setup a host to guest network to run our ssh connections over. This step will create a private network which only the virtual machine and it’s host computer can connect to. Under VirtualBox->Preferences->Network->Host-only Networks, click “add network”
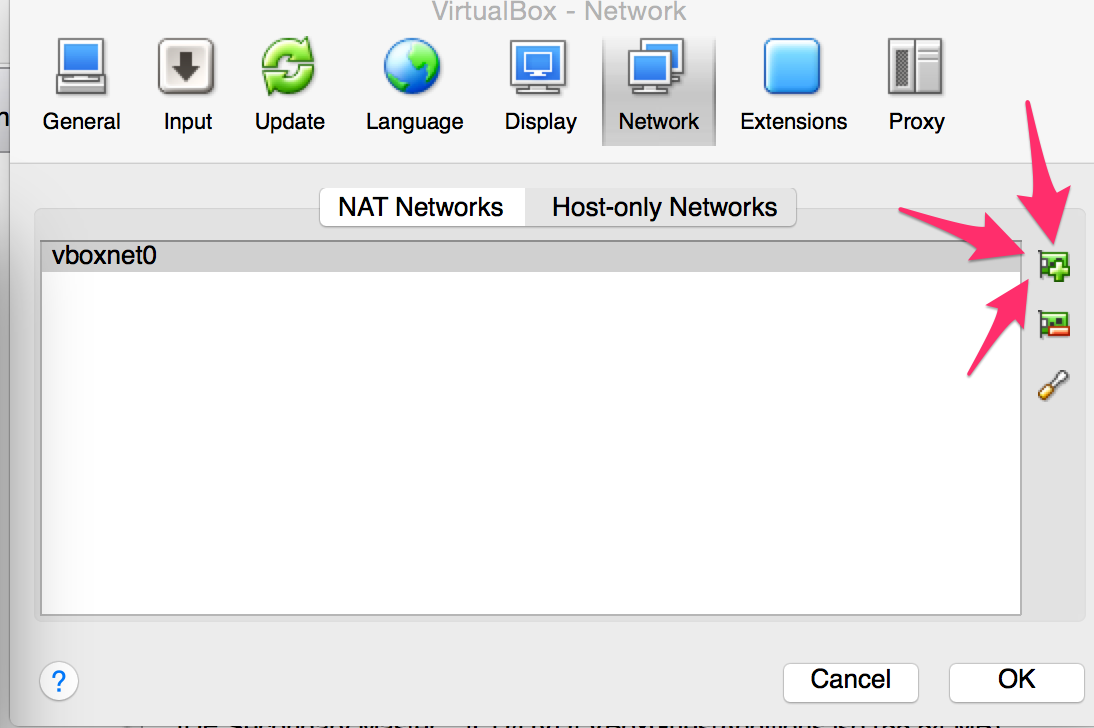
Press OK when you are finished.
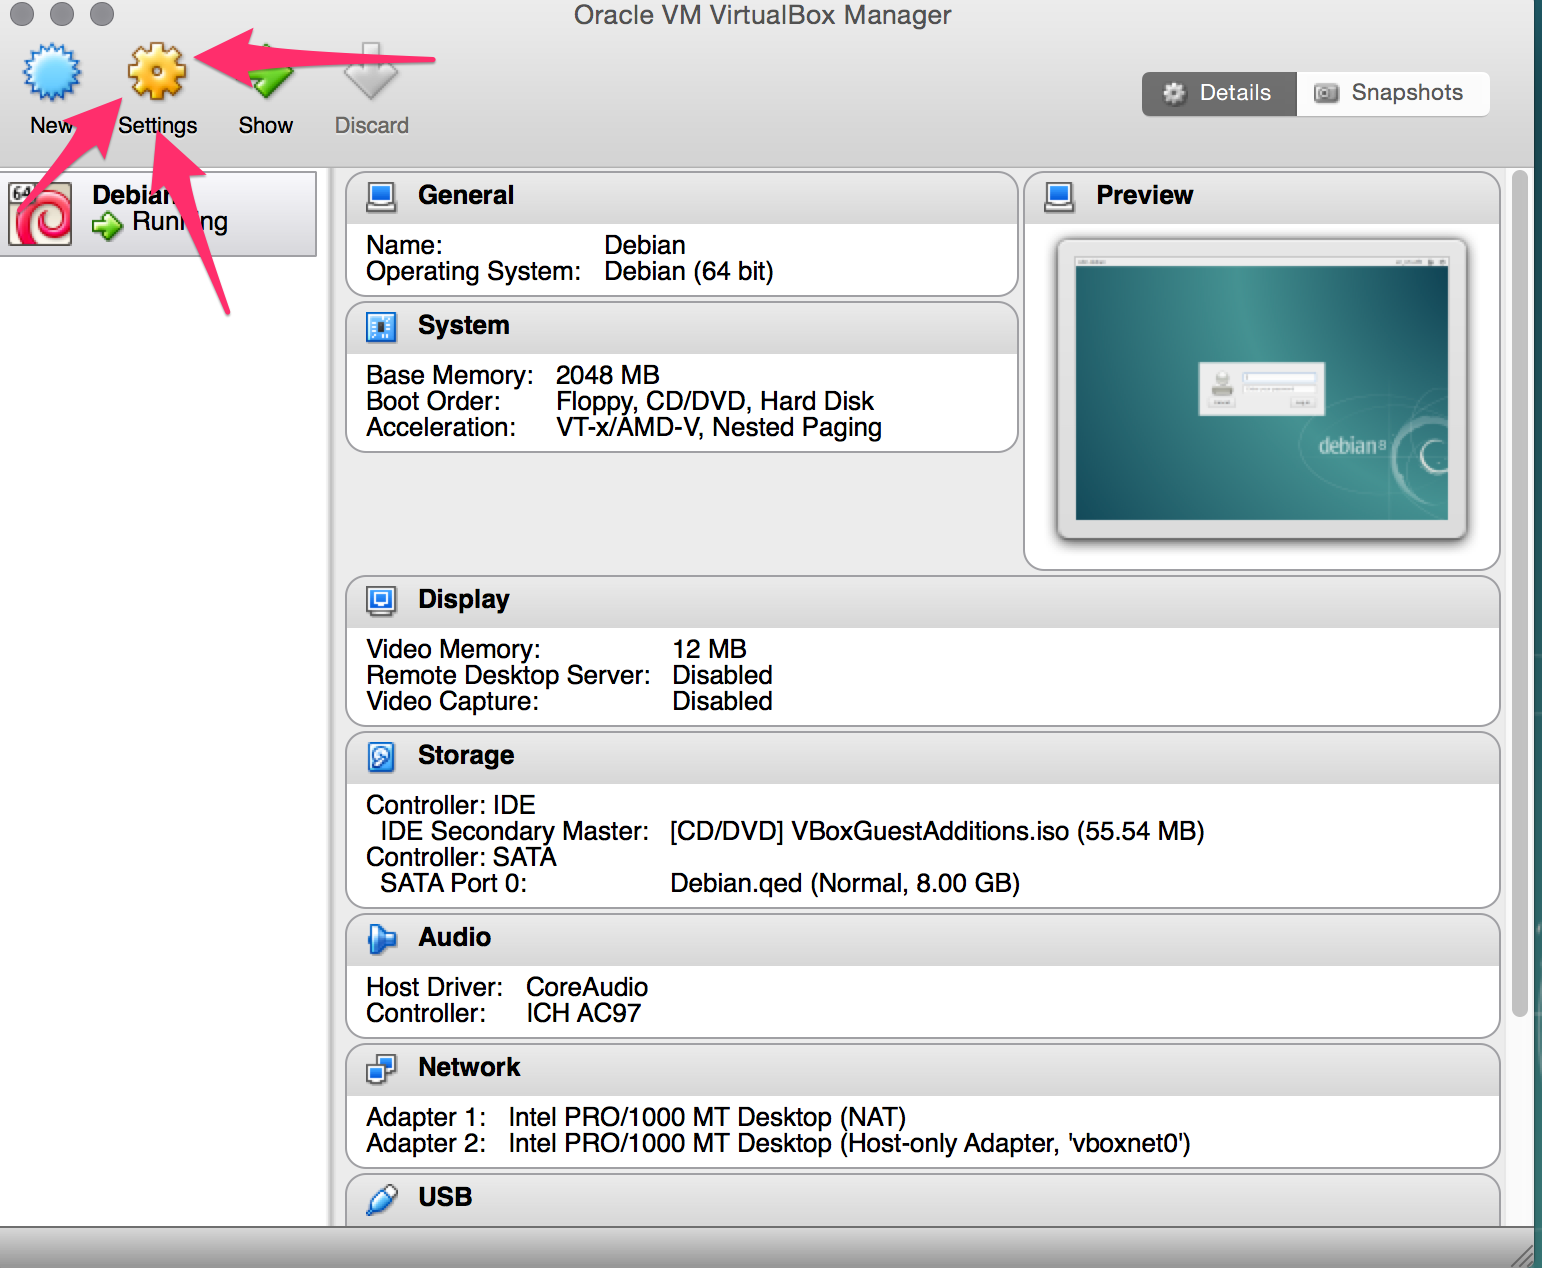
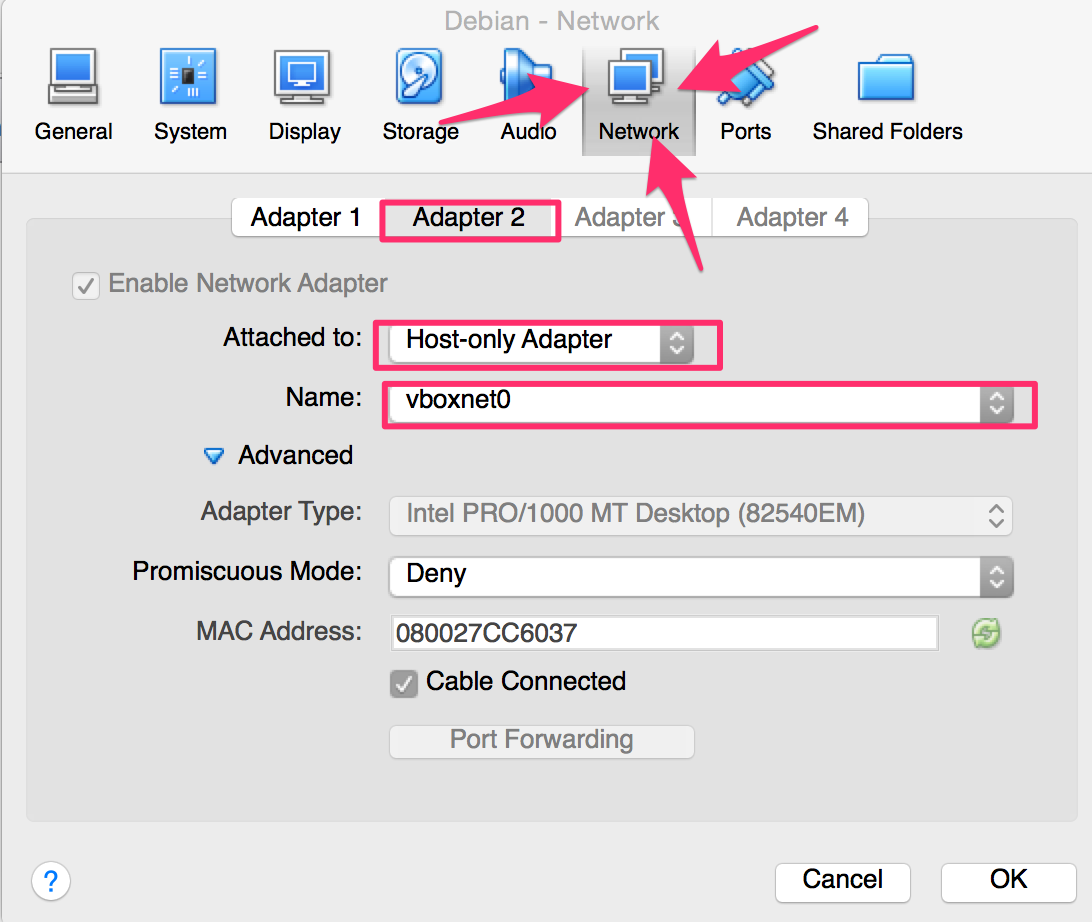
Now, with your Debian Virtual Machine selected, navigate to Settings->Network->Adapter 2. Set the Attached to field to Host-only Adapter, and the Name filed to the network you created in the previous step.
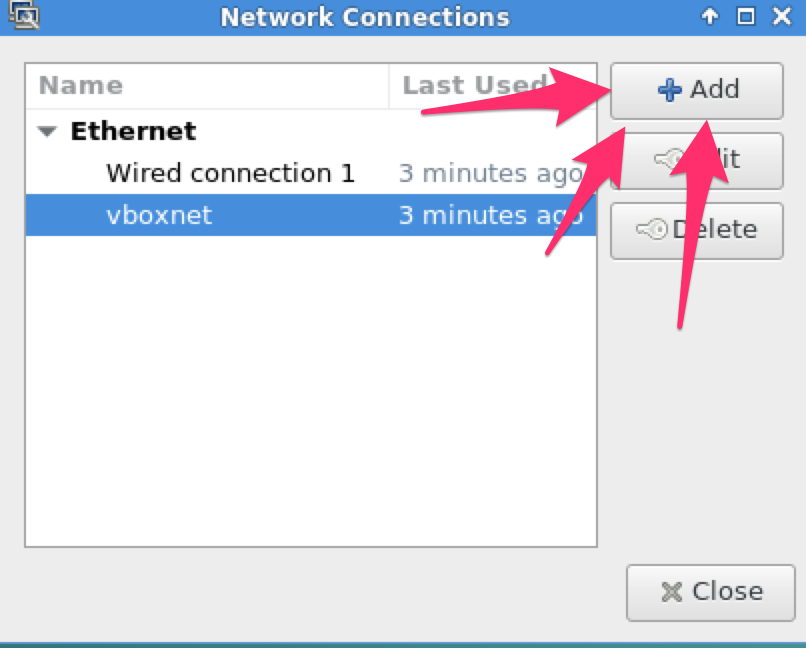
Next we need to configure Debian to use both network adapters (Adapter 1 will provide us access to the Internet, Adapter 2 will let us access our private host-guest network). Log into your VM now, and open the graphical network connections editor (Usually under Applications Menu->Settings->Network Connections). Click Add. Under the Ethernet tab, set Device MAC address to eth1, and Connection name to vboxnet. You should be able to leave all other settings at their defaults. Network Manager should immediately report it has connected to vboxnet, if not, try clicking it from the Network Manager applet in your system tray. If it still does not work, go back and verify you configured everything correctly.
Now we should verify the host and guest can connect to one another over the network. Open a terminal in OSX and run the ifconfig command. You will see a number of network connections listed; look for the one named vboxnet0. It should look something like this:
vboxnet0: flags=8943<UP,BROADCAST,RUNNING,PROMISC,SIMPLEX,MULTICAST> mtu 1500
	ether 0a:00:27:00:00:00
	inet 192.168.56.1 netmask 0xffffff00 broadcast 192.168.56.255
Now run the same command in the terminal on the guest. Note that you may need to run ifconfig as root on Debian. You should see something like this:
eth0      Link encap:Ethernet  HWaddr 08:00:27:f0:7b:91
          inet addr:10.0.2.15  Bcast:10.0.2.255  Mask:255.255.255.0
          inet6 addr: fe80::a00:27ff:fef0:7b91/64 Scope:Link
          UP BROADCAST RUNNING MULTICAST  MTU:1500  Metric:1
          RX packets:28 errors:0 dropped:0 overruns:0 frame:0
          TX packets:234 errors:0 dropped:0 overruns:0 carrier:0
          collisions:0 txqueuelen:1000
          RX bytes:4726 (4.6 KiB)  TX bytes:35783 (34.9 KiB)

eth1      Link encap:Ethernet  HWaddr 08:00:27:cc:60:37
          inet addr:192.168.56.101  Bcast:192.168.56.255  Mask:255.255.255.0
          inet6 addr: fe80::a00:27ff:fecc:6037/64 Scope:Link
          UP BROADCAST RUNNING MULTICAST  MTU:1500  Metric:1
          RX packets:352 errors:0 dropped:0 overruns:0 frame:0
          TX packets:70 errors:0 dropped:0 overruns:0 carrier:0
          collisions:0 txqueuelen:1000
          RX bytes:52947 (51.7 KiB)  TX bytes:11439 (11.1 KiB)
Notice that both interfaces have an inet addr. Finally, you should try to ping the guest from the host, and the host from the guest. In my case, I should be able to ping 192.168.56.1 from the guest, and 192.168.56.101 from the host. You should also be able to ping the guest by it’s hostname, for example ping debian-vbox.local.
#
Configure SSH
First, you should set up a ssh server on your Debian installation, if you did not do so during install. Next you should enable ssh access on OSX, if you have not done so already. You can do so under System Preferences->Sharing->Remote Login. You should now verify you can ssh into the host from the guest, and to the guest from the host.
Now you must setup password-less ssh both from the host to the guest and vice-versa. You can verify this is working by sshing from the host to the guest, and the other way around; you should not be asked for a password.
Next we need to verify X-forwarding is working. On the host computer, run ssh -Y $username@$hostname.local xterm, replacing $username with your username, and $hostname with the hostname of the VM. If you did everything correctly, an xterm window logged into the VM should appear. If not, try running the same command through xterm in X11.app. If the xterm window does appear, ssh has been configured correctly, and you may proceed to the next step.
#
Mac OSX integration
##
Running a proper xfce session within X11.app
One thing you have probably noticed, if you tried launching applications other than xterm, is that they look hideous, being forced to use X11.app’s GTK theme. Some applications may not run at all, such as those which depend on dbus. We can fix this by launching a minimalistic xfce session within X11.app. Specifically, run the following two commands on the host while the guest is running:
ssh -Y $username@$hostname.local dbus-launch&
ssh -Y $username@$hostname.local xfsettingsd&
You can do this automatically each time you log in by creating a simple script:
#!/bin/bash
sleep 120 # give the VM time to spin up
# nohup prevents the process from terminating when the shell session ends
nohup ssh -Y $username@$hostname.local dbus-launch&
nohup ssh -Y $username@$hostname.local xfsettingsd&
You can have the script execute each time you log in under System Preferences->Users & Groups->Your Username->Login Items (replacing Your Username with your username, naturally). To add the script, simply select the + icon int he lower left corner of the Login Items tab, then select your script.
##
Launching Linux applications from OSX
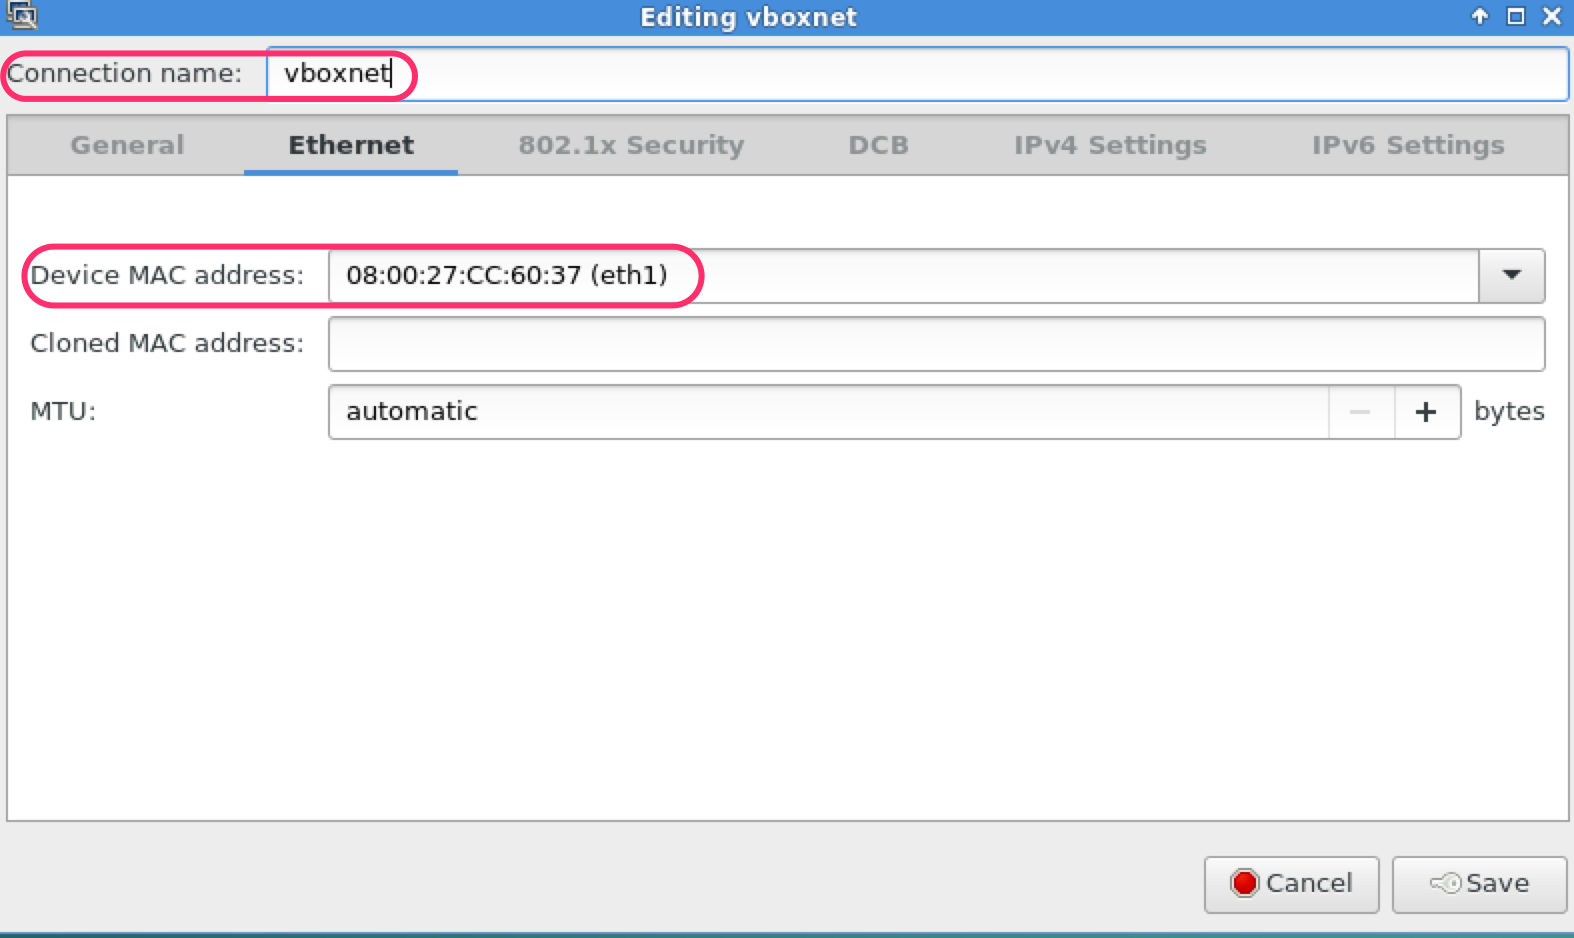
While you can of course launch each application you want from a terminal, this can get a bit tedious. With the X11 application running, select it in the dock, then navigate to Applications->Customize. You should add a new entry with the command ssh -Y $username@hostname.local xfce4-appfinder. You can repeat the exercise for each application you want to be able to launch quickly by replacing xfce4-appfinder with a command of your choice.
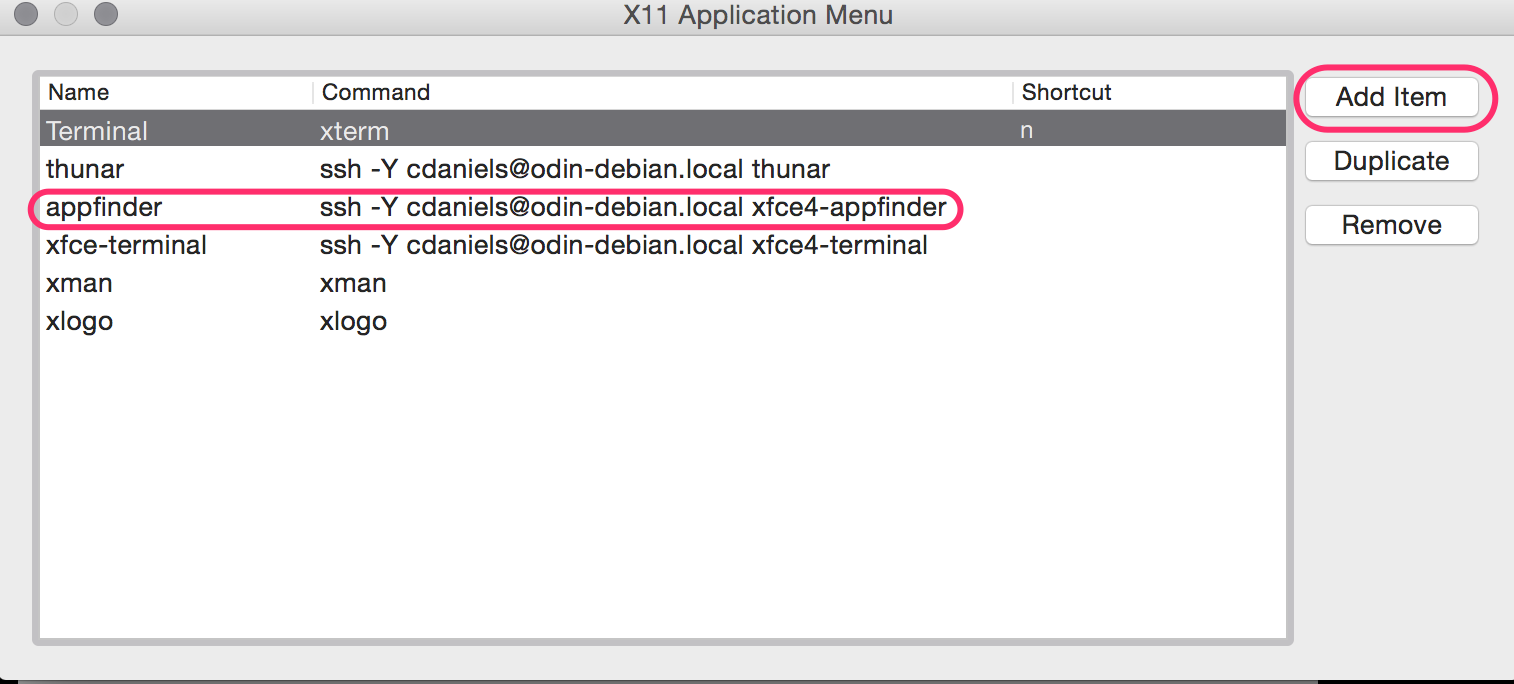
You should now be able to launch xfce4-appfinder, and any other applications you have configured in this way via the Applications menu in X11.app.
##
Setting an OSX browser as your default browser in Debian
One of the pet peeves I had with this setup at first was that open in browser in Debian applications would open an instance of Iceweasel to display the webpage. While I have nothing against Iceweasel, I would prefer links to open in the browser on my host system (in my case Google Chrome). Therefore, I created a simple script:
#!/bin/bash
ssh $username@$hostname.local "/Users/$username/Applications/Google\ Chrome.app/Contents/MacOS/Google\ Chrome $1"
Naturally, $username should be your username on the host, and $hostname should be the hostname or ip (in my case, it was necessary to specify the host system by ip) of your host system on the host-guest network.
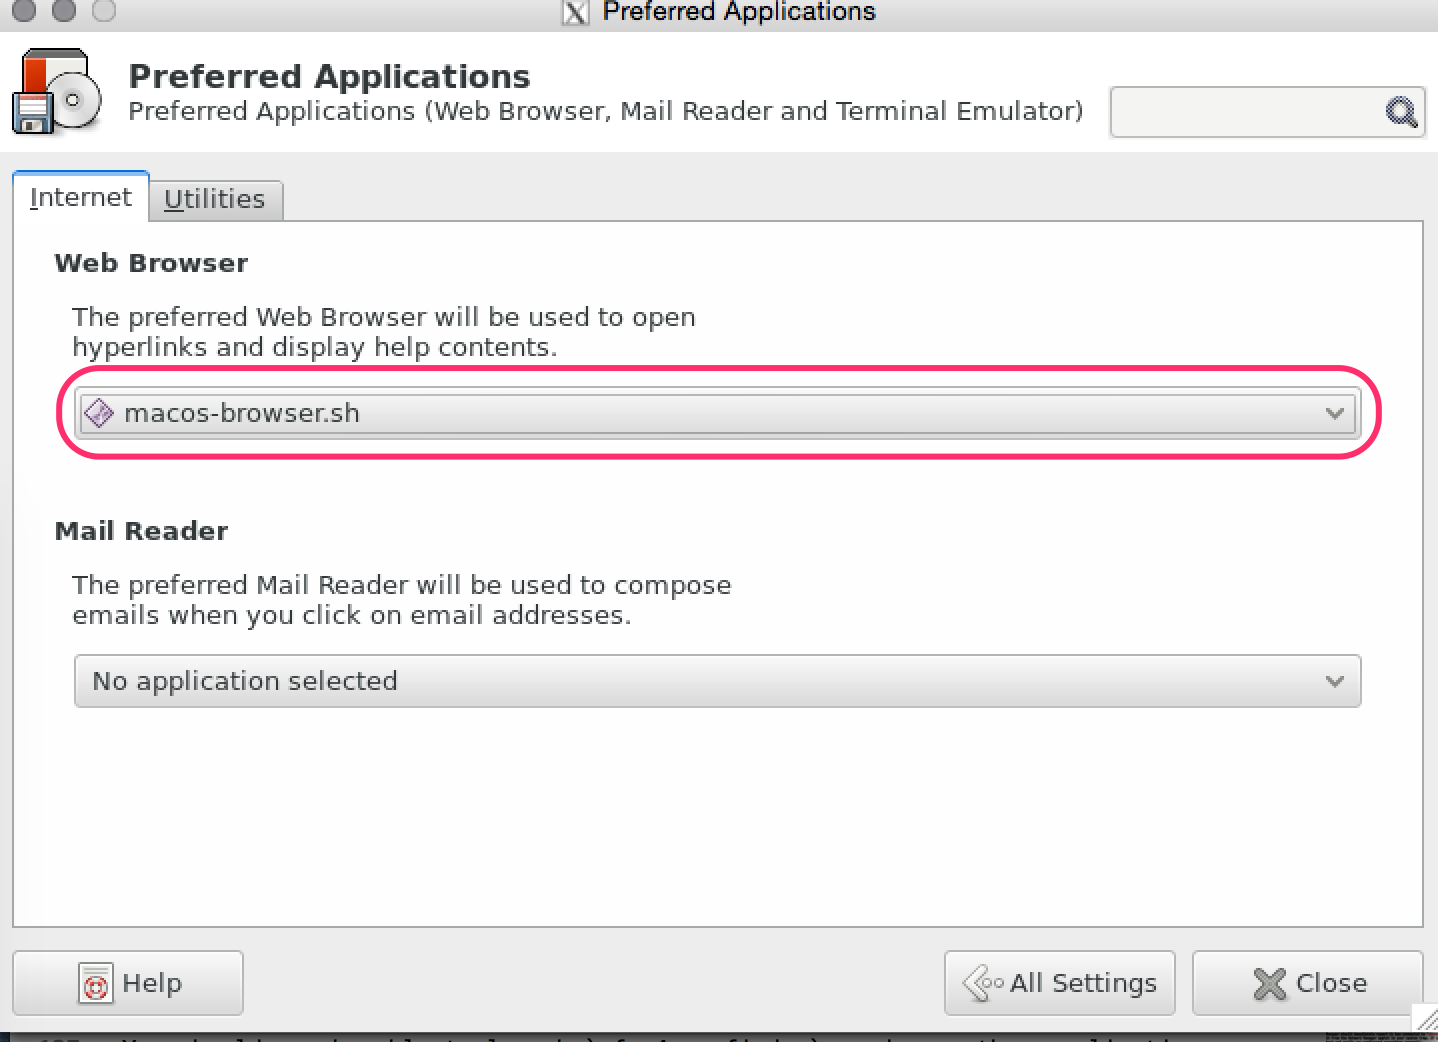
Now simply set your script, in my case ~/bin/macos-browser.sh as your default web browser via xfce4-settings-manager under Preferred Applications->Web Browser->Other.
##
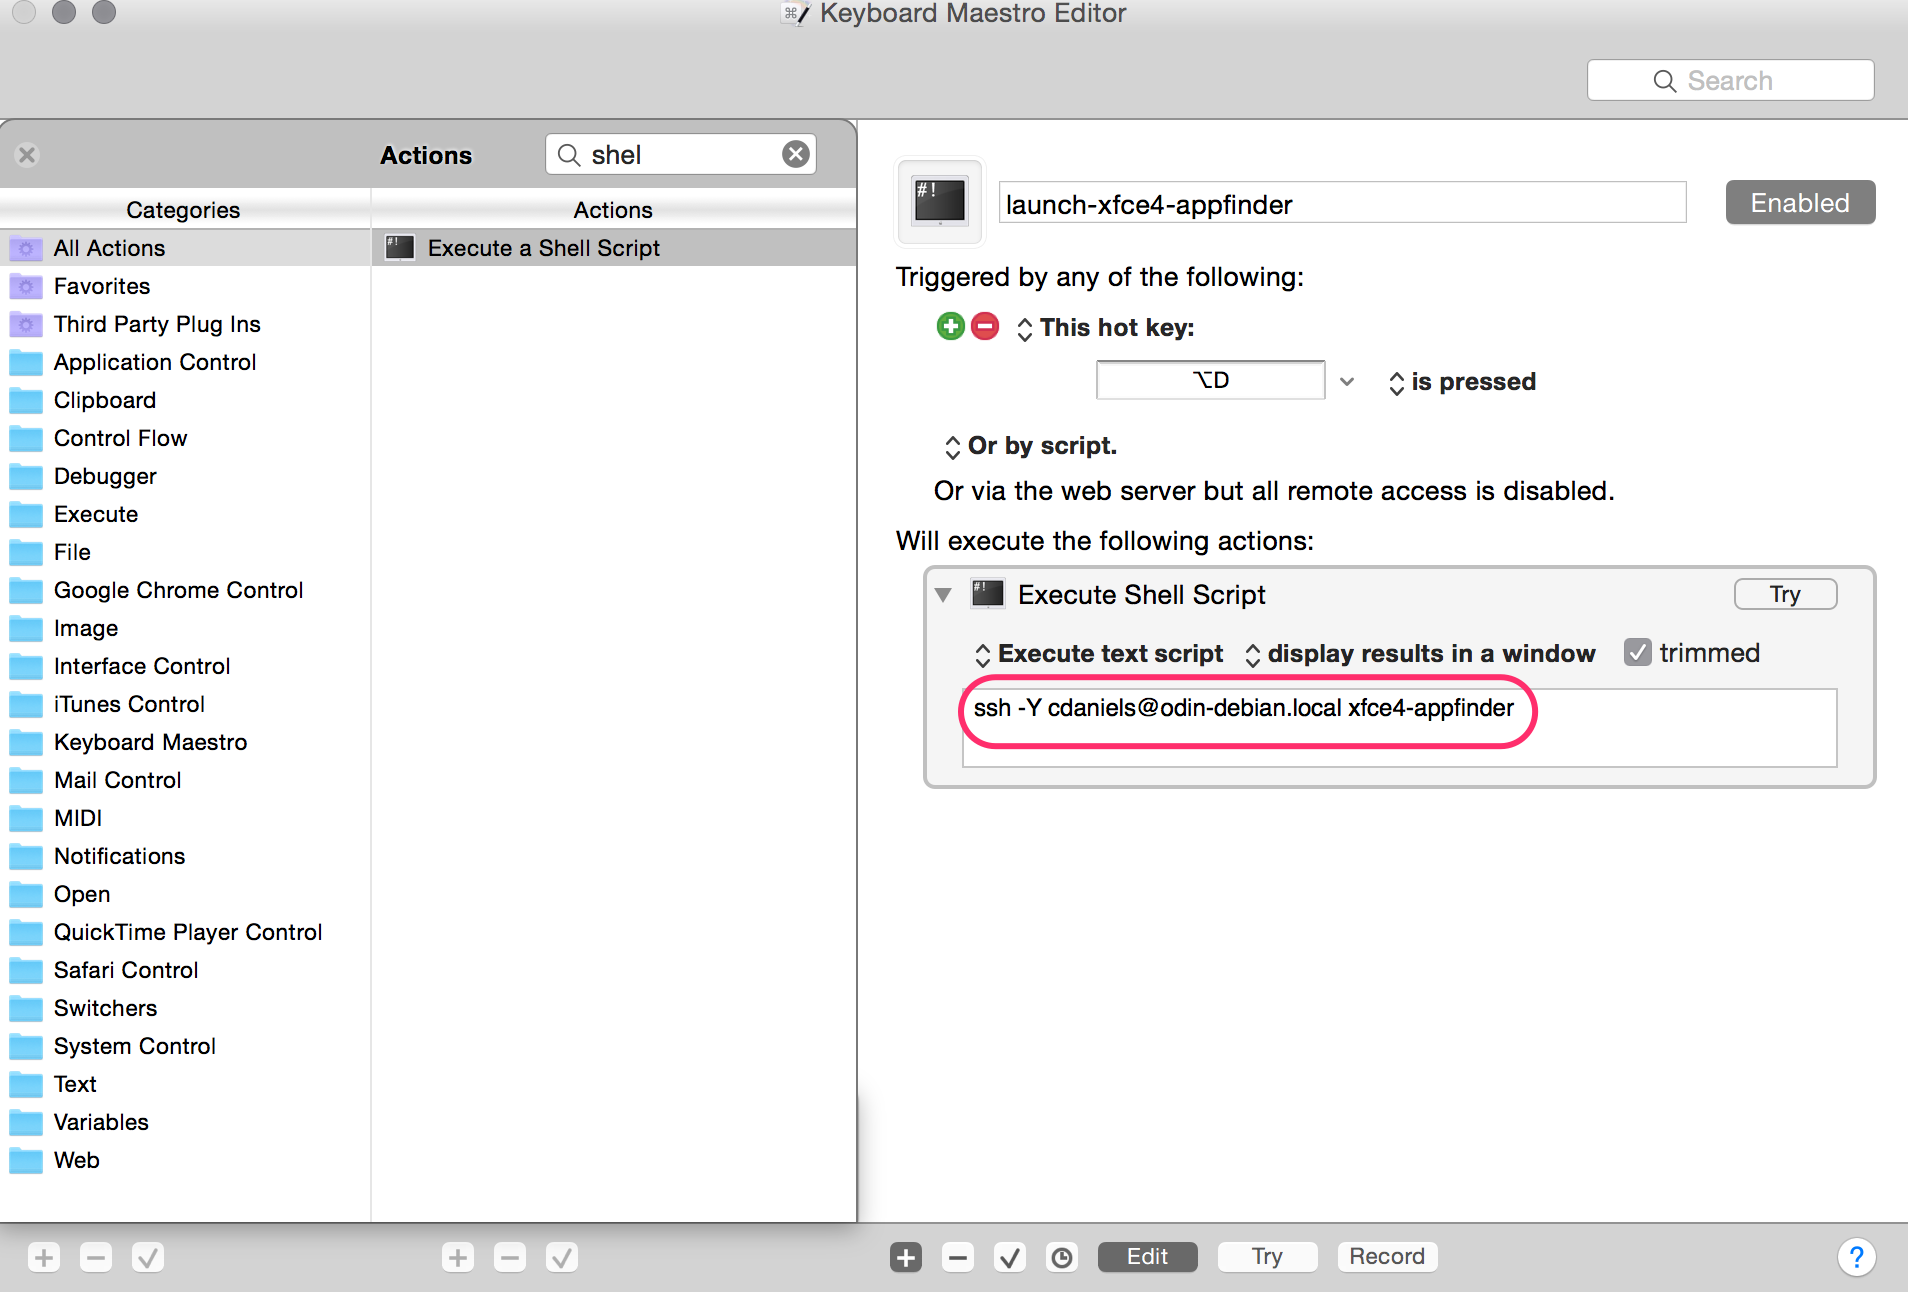
Global keyboard shortcuts
As it was rather inconvenient to select X11.app each time I wanted to launch a Debian application, I used the excellent Keyboard Maestro. Being an i3 user, I bound Mod4+d (that’s option+d for the mac users, and alt+d for the windows users) to launch xfce4-appfinder, and mod4+enter to xfce4-terminal. I suspect that most users will not find theses bindings very intuitive, and I would encourage you to select bindings you are more comfortable with.

##
Sharing folders
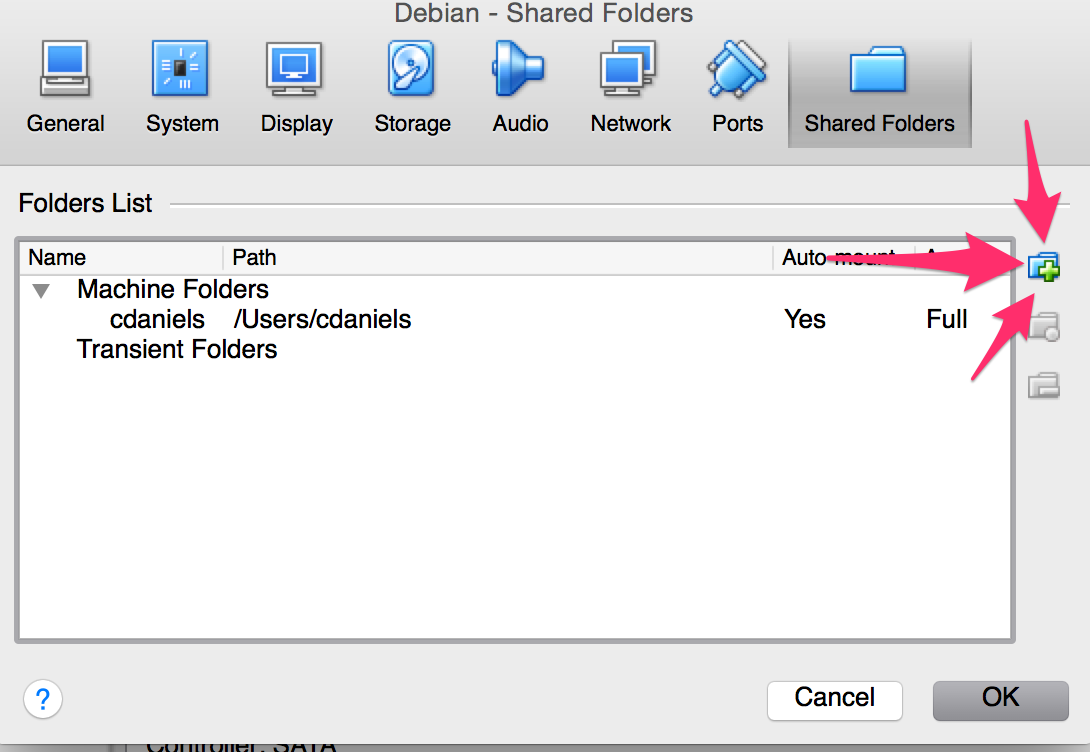
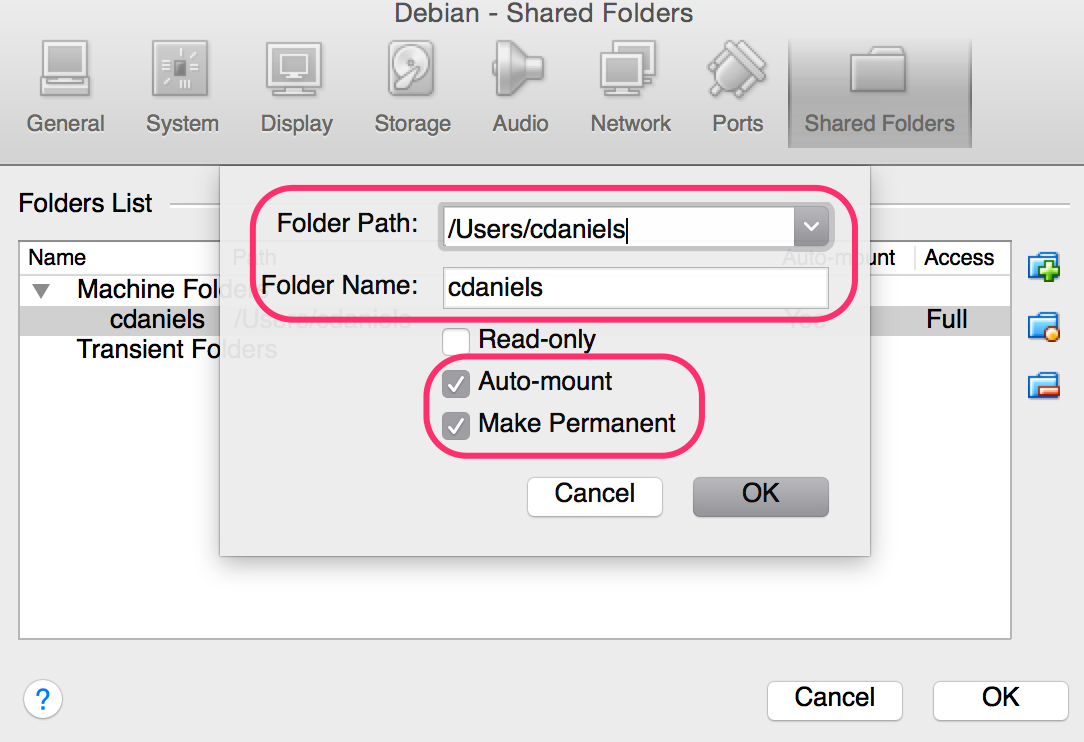
NOTE:You must have the VirtualBox guest additions installed on the VM to complete this step.
I found it useful to mount my Documents, Pictures, Music, etc. folders from OSX to the same folders in the VM. This can be accomplished via folder sharing. Open your VM settings again, then navigate to the Shared Folders tab. Create a new folder; set Folder Path to /Users/$username, folder name to $username, and tick the Auto-mount and Make Permanent boxes. Select OK when you are finished.
In you VM, run the command df -h, it should give you output like this:
Filesystem      Size  Used Avail Use% Mounted on
/dev/sda1       7.4G  3.1G  3.9G  45% /
udev             10M     0   10M   0% /dev
tmpfs           403M  6.0M  397M   2% /run
tmpfs          1006M   68K 1006M   1% /dev/shm
tmpfs           5.0M  4.0K  5.0M   1% /run/lock
tmpfs          1006M     0 1006M   0% /sys/fs/cgroup
none            465G   56G  410G  12% /media/sf_cdaniels
tmpfs           202M  4.0K  202M   1% /run/user/117
tmpfs           202M  8.0K  202M   1% /run/user/1000
Note the mount point of the share (in my case /media/sf_cdaniels).
Now we can use mount --bind to bind the folders from the share to the corresponding folders in our Debian home directory. Add the following lines to /etc/fstab of the guest with an editor of your choice (make sure you are running your editor as root!).
/media/sf_$username/Documents	/home/$username/Documents	  none	bind
/media/sf_$username/Pictures	/home/$username/Pictures		none	bind
/media/sf_$username/Music		  /home/$username/Music	        none	bind
/media/sf_$username/Downloads	/home/$username/Downloads	  none	bind
/media/sf_$username/Movies		/home/$username/Videos	    none	bind
Replace $username with your username. You can mount the folders immediately with sudo mount -a. Now, when you access these folders from a Linux application, the changes will propagate instantly to the same folders in OSX.
NOTE: When I say changes will propagate instantly, I mean it. This effectively hardlinks the folders together, meaning the VM has direct access to the live copy of each folder, so be careful! running rm -rf ~/ on Linux will also wipe out your files in OSX.
NOTE: If you have permissions issues with the share, verify your user is in the group vboxsf with the command groups. If not, add your user to this group with sudo usermod -aG vboxsf $username.
#
Start on login
Next we should configure the VM to launch automatically on login, so you don’t have to manually open VirtualBox and run the VM each time you reboot your computer. This can be accomplished via a launchd plist. You should create a plist file, for example DebianVirtualbox.plist, which you should save to ~/Library/LaunchAgents/DebianVirtualbox.plist. It should look something like this:
<?xml version="1.0" encoding="UTF-8"?>
<!DOCTYPE plist PUBLIC "-//Apple//DTD PLIST 1.0//EN" "http://www.apple.com/DTDs/PropertyList-1.0.dtd">
<plist version="1.0">
<dict>
  <key>Label</key>
  <string>DebianVirtualbox</string>
  <key>ProgramArguments</key>
  <array>
    <string>/usr/bin/VBoxHeadless</string>
    <string>-s</string>
    <string>Debian</string>
  </array>
  <key>UserName</key>
  <string>$username</string>
  <key>WorkingDirectory</key>
  <string>/Users/$username</string>
  <key>RunAtLoad</key>
  <true/>
</dict>
</plist>
You should replace $username with your username, and Debian with the name of your VM, if you named it something different.
I suggest using the application lunchy (not to be confused with launchy). You can install it manually, or via homebrew. If you have installed lunchy, you should now be able to verify your plist has been detected with lunchy list, and check it’s status with lunchy status $plistname, where $plistname is the name of your plist file. Your virtual machine should now launch each time you boot your computer. If you followed the instructions under Mac OSX Integration/Running a proper xfce session within X11.app, your xfce session should also launch two minutes after you log in (the delay is needed to give the VM time to boot).
#
Closing notes
This instructions should work on other operating systems, and with other VM software, with slight modification. For example, you could do something similar on Windows using cygwin to provide ssh and Xorg. You could even use a similar process with a Linux host (for example, using a virtualized older distro to run software the needs specific kernel versions, you could even disable access to the Internet, so only the host can connect to the VM). It should also be possible to do something similar for a remote host, given a strong network connection; this was actually common back in “the day” when applications were run on powerful mainframes, and x11 was provided by what amounted to thin clients.
Some may also be interested in using the virtual machine to provide OSX access to Linux partitions, or to use filesystems not available on OSX. In fact, the creator of the post which inspired me to do this used a feature of vmware to pass a raw partition through to the VM, which was formatted as zfs. This partition was then served to OSX over nfs on the host-guest network.